

















If you’ve ever had to take a photograph on a bright sunny day, chances are pretty high that you would have lost detail, possibly in the shadows or in the highlights, perhaps even both. This is not an exposure problem on your part, it’s more likely a limitation of the dynamic range of your camera – almost all cameras will come up against this problem at some time.

Notice the sky is lacking in detail. It is over exposed – outside of the range of the camera.
There are actually two dynamic ranges you need to think about. One is the dynamic range of the subject, the second is the dynamic range of your camera.
The dynamic range of the subject is a measure of the range of light intensities from the shadows to the highlights. In low light conditions the dynamic range (that is the difference between the darkest and the latest part of the subject) is quite small. On a bright sunny day that range is much higher and is often outside the range of the camera.
Different cameras and different sensors will have bigger or smaller dynamic ranges. As long as the dynamic range of the subject doesn’t exceed the dynamic range of your camera you will be able to get a perfectly exposed photograph.
If the subject dynamic range is bigger than the cameras dynamic range and one part of your subject will be either under or over exposed. You can easily tell if the subject’s dynamic range exceeds that of your camera by using the histogram on your rear screen.

The histogram shows the range of subject brightness starting with black on the left going to white on the right. The width of the histogram chart represents the dynamic range of your camera sensor.
If the histogram fits inside of the histogram display area then the dynamic range of the subject is inside that of your camera and everything is good. If the histogram is clipped at either end then the subject range is too wide. Try changing your camera exposure and watch the histogram move left or right and see if you can fit the histogram inside of the display.
On the histogram shown you can see you can see the shadow area is outside of the sensor’s ability to register. The signal is “clipped” with no details being recorded. The left side of the histogram is crammed up tight against the edge, showing lack of detail.
On the right of the histogram there is still room – the photographer could open up the iris (or use a slower shutter speed) and get more detail in the shadow area without sacrificing detail in the highlights.
Be careful not to over expose the highlights!
A blown out highlight looks terrible whereas a shadow lacking detail is acceptable.
If the subject’s dynamic range is too big and will not fit in histogram and then you need to choose where you will lose information. Ninety-nine percent of the time a photograph that is exposed so the highlights have full detail and the shadows just go black with no detail is a much better option and gives a much more pleasing photograph than one where there is full detail in the shadow but where the highlights are completely burned out.
The almost golden rule is “expose for the highlights,” that is, expose so the highlights are not clipped. Shadows by definition are dark and it is hard to see detail there, so, if you have to loose a portion of the dynamic range it is almost always preferable to loose in the shadows.
There are ways to lift shadows – consider using a fill in flash or a reflector to lighten up those areas if they are close enough to the flashgun that it would have an effect.
Another option – and always a good piece of equipment to have in your camera kit – is to use a graduated neutral density (ND) filter.
Graduated ND Filter
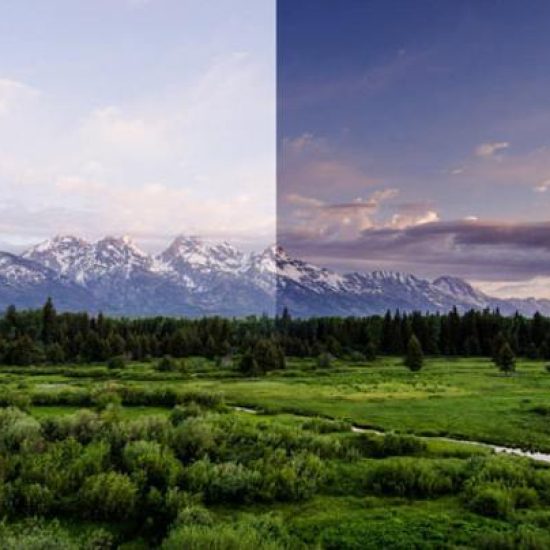
This can be placed in front of the lens and rotated so it reduces the brightness of the sky. These are available in a variety of strengths and can reduce the sky brightness by up to three or more f-stops. You can even use a colored graduated ND filter and add some color to the sky. This is probably the quickest and most effective way of bringing the dynamic range of the subject to match that of the camera.

The above image shows the dramatic difference when using a Graduated ND filter
Another option
One way to increase the dynamic range is with High Dynamic Range (HDR) photography. HDR requires several identical images to be recorded at different exposure value levels. Setting your camera on a tripod is essential as these different exposures will be combined into a single image. You need to set your camera to full manual and then take three (or more) images of the scene. Expose one image as a “normal” . You then take a second and a third exposure, one 1.5 stops under exposing and the other 1.5 stops over exposing.
These images are then combined in special HDR software, such as Photomatix, to give a much wider dynamic range than is possible using a single exposure. Some cameras have an HDR mode that can carry out this process automatically for you.
It is important that you change the shutter speed and not the aperture when making the different exposures. Changing the aperture will alter the Depth of Field (the amount that is in focus in each image). The images need to be identical (with the exception of exposure) when you combine them. Changing the shutter speed and not the aperture ensures this.
Source: Adorama ALC